
 +91 7672 000 500

Introduction
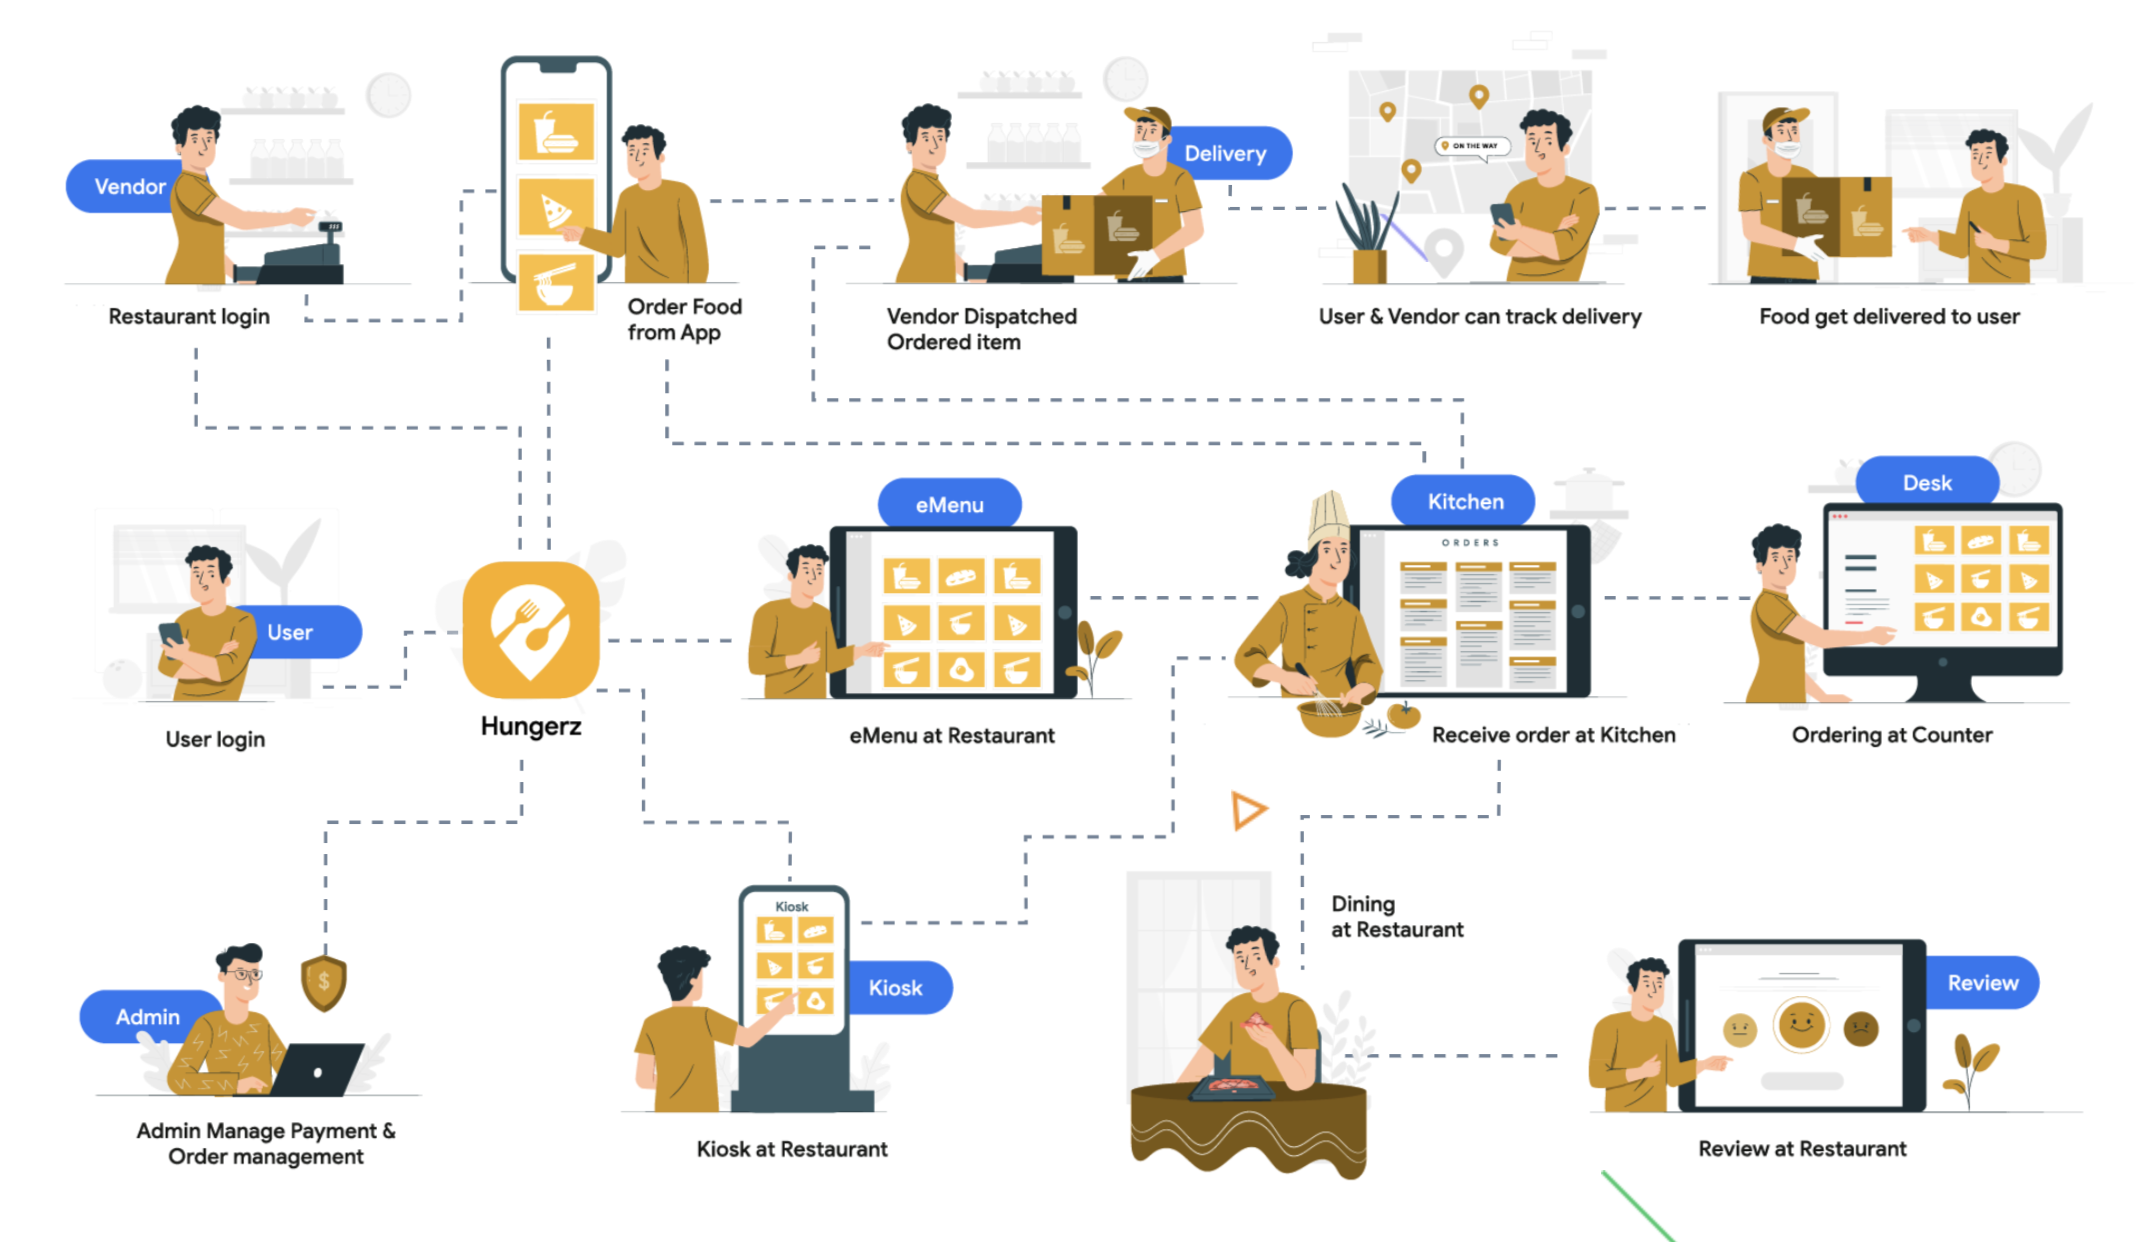
Hungerz is a restaurant POS (point-of-sale) system that is designed to help restaurants manage their orders, payments, inventory, and other operations. Our solution can be used at the front of the house (FOH) to take orders and accept payments, and in the back of the house (BOH) to track inventory and manage food preparation. Hungerz's multi-restaurant online food delivery app and restaurant POS are tightly integrated together to create a seamless experience for both restaurants and customers.
-
Multi restaurant online food ordering app
-
Restaurant management application
-
Delivery application
-
eMenu application
-
Kitchen application
-
Kiosk application
-
Review application
-
Counter application
-
Admin Panel
How it works
Getting Started
Hungerz app is developed using Ionic 6 version and is connected with Laravel 6 based backend using REST APIs, the following documentation will guide you how to setup a server, admin panel and mobile apps.
1. Technologies used
Following technologies are used in this project:
-
PHP >= 7.3
-
Mysql 8 for database
-
Laravel 6 for backend
-
Angular 9 for admin panel
-
nodeJs 12 for admin panel
-
Ionic 6 for mobile application
-
nodeJs 16 for mobile application
Video Guides
For easier understanding of backend installation we have following video guides
Video Tutorial for installing backend on VPS(AWS EC2/Digital Ocean etc):
https://youtu.be/GpwKrmKkHbI
Video Tutorial for installing backend on local system:
https://youtu.be/6Ups0RVjL5Y
Introduction
For server you can choose any shared hosting that supports PHP 7.3 and Mysql 8 or you can setup your server using a VPS like AWS Ec2, Digital Ocean, Vultr etc
1. Services Requirements
You will need following services to setup your server
-
Hosting Account such as Shared Hosting, AWS, Digital Ocean, Vultr etc
-
Mysql Database
2. Server Requirements
The server on which you are going to deploy the backend must fulfill the following requirements:
-
PHP >= 7.3
-
Mysql 8
-
OpenSSL PHP Extension
-
PDO PHP Extension
-
Mbstring PHP Extension
-
Tokenizer PHP Extension
-
XML PHP Extension
- Previous
- Next
Introduction
In this section, we will provide comprehensive instructions on installing our backend codes on your server. Our backend encompasses REST APIs designed for utilization in mobile applications and the admin panel. This step marks the initial stage in utilizing our complete codebase. This guide is tailored for users with familiarity in managing PHP-based shared hosting or a VPS environment
Upload code on server
Uploading code on the server is a straightforward process if you are using VPS like AWS EC2, Digital Ocean, Vultr etc. In case you are using shared hosting some additional steps are required. Every step is clearly mentioned below:
-
Upload and Extract Code:
Upload the Hungerz_Backend.zip file that you received from us to your server. Once uploaded, unzip the file on your server. This will create a directory named Hungerz containing the backend code.
-
Correct location of code:
Only the files and folders in public folder are meant to be web-accessible. For security, all other files and folders in the Laravel framework should not be web-accessible. Make sure your web server's config points to the public directory for DocumentRoot. In cPanel, it means that you only put files and folders of public folder in your public_html directory or in the public_html/subdomain directory in case using subdomain for backend
-
cPanel on shared hosting:
If you are using cPanel on shared hosting it requires some additional steps to correctly configure laravel based backend. Follow these steps:
-
Upload the "Hungerz_Backend.zip" file that you received from us on your shared hosting using cPanel's File Manager
-
Unzip the zip file in root folder, this will create Hungerz folder in root folder of your shared hosting
-
Open the Hungerz folder and MOVE the CONTENTS of the public folder to your cPanel’s public_html folder. You can as well delete the empty public folder now.
-
Navigate to the public_html folder and locate the index.php file. Right-click on it and select Code Edit from the menu
-
This will open up another tab showing the cPanel code editor.
-
Make following changes in index.php
`require __DIR__.'/../bootstrap/autoload.php';
...
$app = require_once __DIR__.'/../bootstrap/app.php';`

to

`require __DIR__.'/../bootstrap/autoload.php';
...
$app = require_once __DIR__.'/../Hungerz/bootstrap/app.php';`
-
-
Access the Backend URL:
You can access your backend's homepage http://mybackend.com (replace "mybackend.com" with your actual domain), given your web server's document root is pointing to hungerz/public/ folder incase of VPS and public_html in case of shared hosting.
Create Database
In cPanel, navigate to the MySQL Databases section and create a new MySQL database and a user. If using VPS connect to your mysql instance from command line and create a database. Take note of the database name, username, and password as you will need them for your Backend application's configuration.
Firebase & Onesignal
Prior to deploying our codes on your server, it is essential to set up your server environment and third-party services. The following steps will guide you through the necessary procedures to prepare your server, ensuring seamless compatibility with our software codebase.
Create a Firebase project
Creating a Firebase project involves several steps to set up your project, enable required Firebase services, and integrate Firebase into your application. Here's a step-by-step guide:
-
Sign in to Firebase Console
Go to the Firebase Console (https://console.firebase.google.com/) and sign in with your Google account. If you don't have one, you need to create a Google account first.
-
Create a New Project
Click on the "Add project" button and provide a name for your new Firebase project. You can also select an existing Google Cloud project to use as your Firebase project.
-
Enable Firebase Services
Once your project is created, you will need to enable the Firebase services: Authentication, Realtime Database, Storage
-
Set Up Authentication
Go to the "Authentication" section and enable the following sign-in methods - Phone and Google
-
Set Up Realtime database
Go to the "Realtime Database" section and enable it
-
Set Up Storage
Go to the "Storage" section and enable it
-
Firebase project ID
Note down your firebase project id, this will be later used in the configuration. Go to Project Overview > Project settings > Project Id
-
Google Client ID
When you enable Google in Authentication, you will get Web client ID from Authentication > Sign-in Method > Google > Web SDK configuration > Web client ID. Note down your Web client ID, this will be later used in the configuration.
Create a Onesignal project
Onesignal is used to send push notifcations, if you are just starting out you can skip this step initially, once your setup is done you can come back at this step at later stage. Creating a OneSignal project involves setting up a new account on the OneSignal platform. Here's a step-by-step guide to create a OneSignal project:
-
Sign Up on OneSignal
Go to the OneSignal website (https://onesignal.com/) and click on "Sign Up" to create a new account.
-
Create a New App
After signing in, click on "Add App" in the dashboard to create a new app for your project.
-
Keys & IDs
Go to Settings > Keys & Ids section of your app and note down OneSignal App Id & Rest API key. If project has multiple apps you will need to create that many apps in Onesignal as well.
Code Structure
Our Laravel project is structured with a focus on modularity and maintainability. The core functionality is organized into separate composer packages, each starting with the name "vtlabs." These packages house the essential logic for various aspects of the application, such as user management, ecommerce, appointments, and payments. To access or modify the core code, navigate to the respective package located in the "vendor/vtlabs" directory. Here are some key packages and their functionalities:
-
core
Contains foundational code serving as the base for other packages. It includes APIs for user-related operations, API authentication, and other fundamental functionalities.
-
category
Focuses on category management logic, handling operations related to categorizing various elements within the application.
-
ecommerce
Contains all the functionalities related to vendors, orders, delivery profiles
-
payments
Responsible for handling payment-related operations, including processing transactions securely.
As you explore the vendor/vtlabs folder, you may encounter additional packages that further enhance the application's capabilities. Feel free to navigate and familiarize yourself with the code structure to facilitate seamless development and customization. This modular approach allows for easier maintenance and scalability, enabling developers to extend and customize specific functionalities as needed.
Configuration
In our backend project's root directory, find the .env and update the following details in .env file
-
APP_NAME
Enter your app's name in double quotes for example:
APP_NAME="My Backend"
-
APP_URL
URL of your project for example:
APP_URL="https://mybackend.com"
-
APP_DEBUG
Enable/Disbale debugging in your project, this should be set to false in production, for example:
APP_DEBUG=false
-
DB_HOST
Name of your database host, for example
DB_HOST=127.0.0.1
-
DB_DATABASE
Name of your database, for example
DB_DATABASE=myapp_db
-
DB_USERNAME
Username of your database, for example
DB_USERNAME=admin
-
DB_PASSWORD
Password of your database, for example
DB_PASSWORD="YOUR_PASSWORD"
-
USE_QUEUE
Set to false, for example
USE_QUEUE=0
-
FIREBASE_ID
Project id of your firebase project
FIREBASE_ID=project-id
-
ONESIGNAL_APP_ID_CUSTOMER
App ID of your onesignal app, for example
ONESIGNAL_APP_ID_CUSTOMER=project-id
-
ONESIGNAL_REST_API_CUSTOMER
REST API key of your onesignal app, for example
ONESIGNAL_REST_API_CUSTOMER=project-id
-
GOOGLE_CLIENT_ID
This is required to enable social login using Google from app, it's google web client id from your firebase project, for example
GOOGLE_CLIENT_ID=google-web-client-id
There are other keys in .env file as well, keys mentioned above are essential for running the backed, if you have knowledge about laravel framework you can have a look by yourself
Database
Next you'll need to import a .sql file into your database. This file contains the necessary data and schema to configure the backend properly. Sql file is located in the root of the project.
By following these steps, you'll successfully deploy the backend on your server, and it will be ready to serve as the backbone of your application. Now you can access and utilize the backend's services through the specified URL. If you encounter any issues or have questions, refer to the documentation for further assistance. Happy coding!
- Previous
- Next
Backend Troubleshoot
There some commmon pitfalls while installing the backend on your server. They are not directly related to our product and comes with any kind of backend related development. If you are an experienced developer you may have already encountered these problems before and know your way out of them but if you are a new developer these instructions might help you to fix or identify your issues.
Pretty URLs
This problem often comes with Apache HTTP server, suppose you are expecting your base url to be https://backend.example.com but backend is not accesible on this url, then try https://backend.example.com/index.php, if it's working and you see name of your application then it implies that pretty urls are not working on your webserver. Check the public/.htaccess file, if it's not there then copy the content from
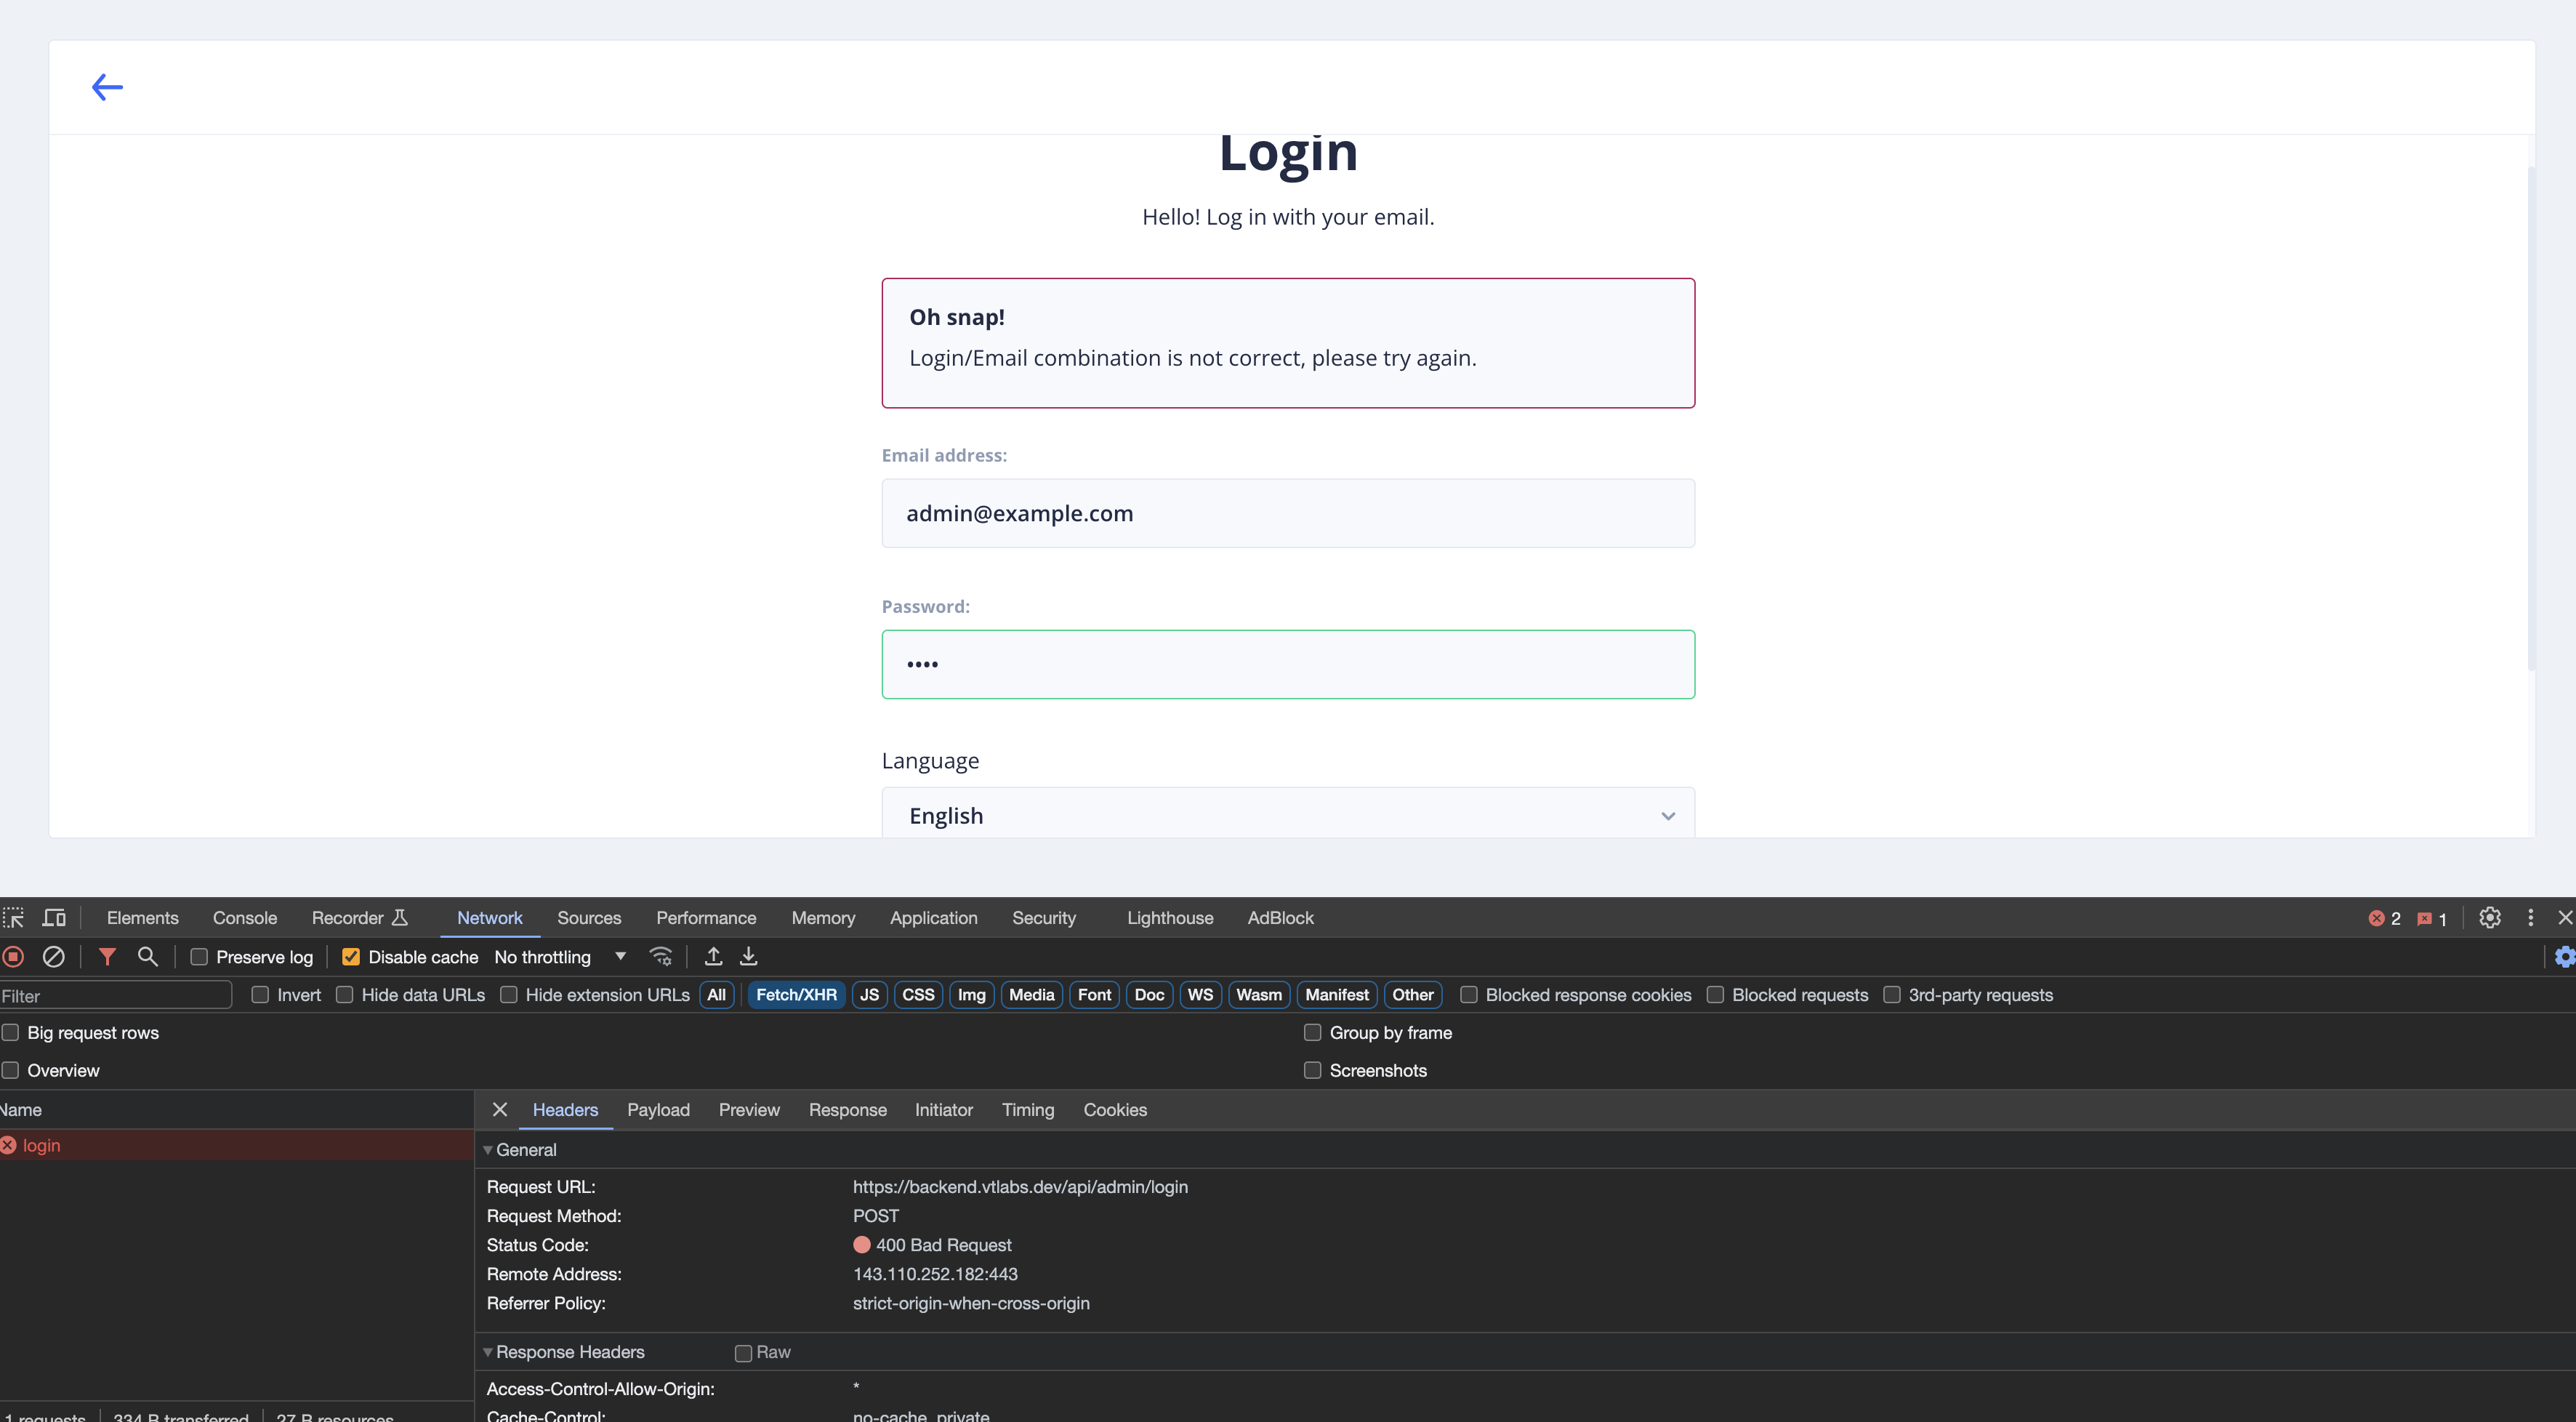
in your public/.htacess, but if the public/.htaccess file is already there then be sure to enable the mod_rewrite module in your Apache. If you are still unable to fix this problem then you will need to include index.php in your backend url, including base url that you will use in admin and mobile apps.Unable to login in admin panel
You can check the Network Tab in Chrome's Developer Console to view kind of error being return from the admin login api
- Previous
- Next
Introduction
Admin panel is developed in Angular 9 and it's compiled version is shipped in public/admin folder.
Configuration
There is very little configuration required to run the admin panel. You just need to set few configuration values and it's ready to use. Make the following changes in code present under public/admin folder
-
Open public/admin/assets/appConfig.json
-
Update appName
Write your app's name in appName
appName="My Backend"
-
Update apiBaseUrl
Write your app's base url in apiBaseUrl
apiBaseUrl="https://mybackend.com/api/admin"
Making Changes
If you need to make any changes in admin panel, follow these steps
-
Extract Hungerz-admin.zip, it’s an Angular 9 based project, nodeJs 12 is required to compile the code.
-
Run following command from terminal inside extracted code:
npm install
-
If you are not familiar with Angular 9 we suggest you to get basic idea from https://angular.io/guide/quickstart
-
After making the required changes in code run following command
ng build --prod --base-href=/admin/
-
base-href value will change if your admin folder is nested in subfolders. /admin value will work if you can access the admin using this url https://Hungerz.com/admin. If for example your admin is accesible from https://Hungerz.com/public/admin/ then you will have to use base-href=/Hungerz/admin/ in the last command
-
Check the dist folder after running ng build command, angular places the compiled files in dist folder
-
You need to copy all the files in dist folder to you Laravel’s public/admin folder.
-
For example
cp -r Hungerz-angular/dist/* Hungerz/public/admin/assuming Hungerz-angular is your angular project folder and Hungerz is your laravel project folder
- Previous
- Next
Introduction
Following section explains how to connect Andrioid App to server and built it properly
Download And Setup Ionic
-
Install Node.js version nodeJs 16 on your system
-
Install node with installer and on screen instructions
-
Verify node installation by running `node -v` you should see version nodeJs 16 output
-
Install ionic globally 6.19.0 by running `npm install -g @ionic/cli@6.19.0`
-
Install cordova globally for platform builds by running `npm install -g cordova@11.0.0`
-
Verify installation by running `cordova -v` you should see version 11.0.0 output
Download And Setup Ionic
-
Create one firebase project and add respective applications in that project. https://console.firebase.google.com
-
Add your machine's SHA-1 certificate for firebase authenticaiton. https://stackoverflow.com/questions/15727912/sha-1-fingerprint-of-keystore-certificate
-
Enable Realtime database with following rules to avoid any warnings:
{"rules":{"fire_app":{".read":true,".write":true},"users":{".read":true,".write":true},"deliveries":{".read":true,".write":true},"vendors":{".read":true,".write":true},"orders":{".read":true,".write":true}}} -
Enable Storage with following rules:
rules_version = '2'; service firebase.storage { match /b/{bucket}/o { match /{allPaths=**} { allow read, write; } } } -
Keep a note of your Application IDs(package names), google-services.json files, Web API Key, Project ID and keys from Cloud Settings for OneSignal setup. https://app.onesignal.com/apps/new
Setup And Customization
-
Add configuration files(google-services.json) aquired from step 2 into respective project's app folder
-
Basic configuration requires 3 files to be edited. -> `config.xml`, `src/app/app.config.ts` and `package.json`.
-
To change app icon and splash in your template for refer https://stackoverflow.com/questions/55813237/how-to-change-default-app-icon-and-splash-screen-in-ionic-4-application
-
`images` To change logo and other image assets (only `.png` files) in your templete from `src/assets/images`
-
To change other image assets (other `name` image). Here you put assets path `src/assets/image_name.png` in your screen `app` `your_page_name.page.html`. to display same screen
Modify app.config.ts
-
`app.config.ts` includes all other necessary variables. Let's look at each of them.
-
`appName` Here you put in your app name, this one is used to display app's name inside the app.
-
`apiBase` Here comes your backend/server/api integration. Fill in your api base url. For example -> `apiBase: "https://yourdomain.com/"`
-
`googleApiKey` This is used for google maps services. Go to your Project in firebase console. Go to settings - General tab and copy `Web API Key` and paste in here.
-
`oneSignalAppId` Register your apps here https://app.onesignal.com/ (3 - user's, store's and delivery guy's application). Get respective OneSignal app ID's to copy in here.
-
`oneSignalGPSenderId` This is used for google maps services. Go to your Project in firebase console. Go to settings - Cloud Messaging tab and copy `Sender ID` and paste in here.
-
`firebaseConfig` Used for firebase realtime database, google authentication and phone authentication. See this for setup instructions https://firebase.google.com/docs/web/setup#config-object
Changing Colours And Theme Settings
-
`src/global.scss` - contains application's primary colours and overall styling of various components
-
`src/theme/variables.scss` - containing primary colours for various widgets used throughout the application. For example radio buttons. Also used for dark mode colouring
-
Find `--primary` and `--secondary` in `global.scss` to change main `respective colour` of the app. Other colour codes below are also customizable
-
Find `--ion-color-primary` in `theme/variable.scss` to change main `respective colour` of widgets in application
-
Find `@media (prefers-color-scheme: dark)` in `theme/variable.scss` and uncomment everything below from here to enable System wide dark mode colour settings
-
`config.xml` has two values. Your template's package name/template id in id parameter in line no. 2. and template name in line number 3
First Run
-
Open your desired cmd/terminal and navigate to the source folder (project)
-
run `npm install` to install project dependencies
-
then run `ionic serve` to run your project in browser
-
Entering into `INSPECT` mode of browser to see mobile view of the app
-
For desk angular application, run `npm install` to install dependencies and `ng serve --open` to run project in default browser
Build Android app
-
Download and install Java here: https://www.oracle.com/technetwork/java/javase/downloads/jdk8-downloads-2133151.html
-
Android SDK setup. We recommend installing `Android Studio` for easy setup. https://developer.android.com/studio/
-
To add platform run `ionic cordova platform add android@8.1.0`
-
To prepare platform run `ionic cordova prepare android`
-
To build debuggable .apk file run `ionic cordova build android --prod`
-
To build release unsigned .apk file run `ionic cordova build android --prod --release`
-
To generate a `Keystore` refer this. https://stackoverflow.com/questions/11446121/how-do-i-generate-a-keystore-for-google-play
-
To sign builds and publishing refer this. https://ionicframework.com/docs/deployment/play-store
Build iOS app
-
To add platform run `ionic cordova platform add ios@5.1.1`
-
To prepare platform run `ionic cordova prepare ios`
-
To build debuggable .apk file run `ionic cordova build ios --prod`
-
Opening respective project, open the .xcworkspace file in ./platforms/ios/ to start Xcode.
-
For XCode setup refer this. https://ionicframework.com/docs/developing/ios
Deployment Of Applications
-
To sign builds and publishing android app refer this. https://ionicframework.com/docs/deployment/play-store
-
To sign builds and publishing iOS refer this. https://ionicframework.com/docs/deployment/app-store
-
Kindly refer to this https://ionicframework.com/docs/intro/deploying/ for further instructions.
We’re Available for Custom Design / Development
Need Mobile App/Customization?
